

When you see a colourful, seamless rubber playground floor, you're looking at wet pour rubber. It’s essentially a permanent safety cushion, mixed and installed right on-site to create one of the safest and most practical surfaces for play.
So, what exactly is it?
Forget loose-fill materials like bark or sand that get kicked around and create bald spots. Wet pour rubber is a "bound" surface, meaning it's a single, solid mat. The installation process itself is where the name comes from: rubber granules are mixed with a special polyurethane binder on-site, then poured and hand-trowelled into place, a bit like laying concrete for a new footpath.
This creates a perfectly smooth, continuous surface with no seams or joints. Right away, that eliminates common trip hazards. It also means the area is completely accessible for wheelchairs, prams, and anyone who needs a stable surface underfoot. Plus, it's porous, so rainwater drains straight through, preventing slippery puddles and making it ready for play almost immediately after a downpour.
The real magic of wet pour rubber lies in its two-layer construction. It’s not just one slab of rubber; it’s a carefully engineered system where each layer has a specific and crucial job.
The Shock-Absorbing Base Layer: This is the unseen workhorse of the system. It’s a thick foundation layer typically made from larger granules of recycled SBR (Styrene-Butadiene Rubber). Its sole purpose is to absorb impact – to cushion a fall and drastically reduce the risk of serious injury. The thickness of this base layer isn’t random; it’s calculated precisely to meet the required Critical Fall Height for the play equipment it surrounds.
The Durable Top Layer: This is the vibrant, colourful layer you see and walk on. It's usually a 15-20mm thick coating of much finer EPDM (Ethylene Propylene Diene Monomer) rubber granules. EPDM is a premium synthetic rubber chosen for its incredible toughness, colour stability, and resistance to UV rays. It’s what keeps the surface looking great and prevents it from cracking or fading under the harsh Australian sun.
This clever combination of a soft, protective base and a tough, resilient top is why wet pour rubber is such a trusted choice for schools, councils, and childcare centres. It delivers on safety, durability, and opens up a world of design possibilities.
Think of it like this: the base layer provides the life-saving cushioning, while the top layer provides the long-lasting, colourful finish that can withstand years of constant foot traffic and weather.
Ultimately, this dual-layer construction does more than just cover the ground. It transforms a play area into a purpose-built safety zone, giving you the peace of mind that you’ve provided the highest standard of protection for the children in your care.
It’s easy to think of wet pour rubber as just a colourful floor for a playground. But the real magic isn’t just in what you see—it’s in the carefully engineered system working away beneath the surface. Think of it less as a single material and more as a high-performance safety duo, with each part playing a distinct and vital role.
The true hero in this partnership is the layer you'll likely never see: the base layer. Often called a shock pad or impact layer, this is where the serious work of fall protection happens.
Let's start from the ground up. The base is a thick, springy cushion made from black SBR (Styrene-Butadiene Rubber) granules. These granules are a fantastic example of smart recycling, as they’re sourced from end-of-life truck tyres, diverting an enormous amount of waste from landfill.
During installation, these coarse granules are mixed with a strong polyurethane binder and trowelled onto the sub-base. The crucial part? It’s laid to a very specific thickness, one that is calculated with precision.
Its job is simple but critical: to absorb shock. When a child falls, the SBR layer acts like a giant sponge for energy. It compresses on impact, spreading the force out and slowing the deceleration. This is the absolute key to preventing the severe head injuries that can result from a sudden stop on a hard surface.
That thickness isn't just a guess. It’s directly tied to the Australian Standards and the height of the play equipment it sits under. For instance:
This ability to dial in the thickness is what makes wet pour rubber such a versatile and reliable safety surface for any playscape design.
While the SBR base is all about unseen safety, the top layer is where durability and design come to life. This wear layer, typically about 15mm thick, is constructed from EPDM (Ethylene Propylene Diene Monomer) rubber granules. EPDM is a premium, purpose-made synthetic rubber, known for its incredible toughness and resistance to the elements.
Unlike the recycled SBR below it, EPDM is a virgin material created specifically for this purpose. This means it can be produced in a huge spectrum of vibrant, UV-stable colours that won’t fade quickly under the harsh Australian sun. This opens up a world of creative possibilities, from simple, bold colour schemes to intricate logos, patterns, and built-in games like hopscotch or custom tracks.
This is where function truly meets form. The unseen SBR base provides the critical fall protection, while the EPDM top layer delivers the colourful, hard-wearing, and slip-resistant finish that makes a play space both safe and inviting.
This clever separation of roles is what makes the system so effective. We use the cost-effective, recycled SBR for the bulk thickness needed for safety, and then apply the premium, colourful EPDM only where it’s needed most—on the surface that takes all the foot traffic and weather.
This flowchart gives a great visual breakdown of how these two layers work together.
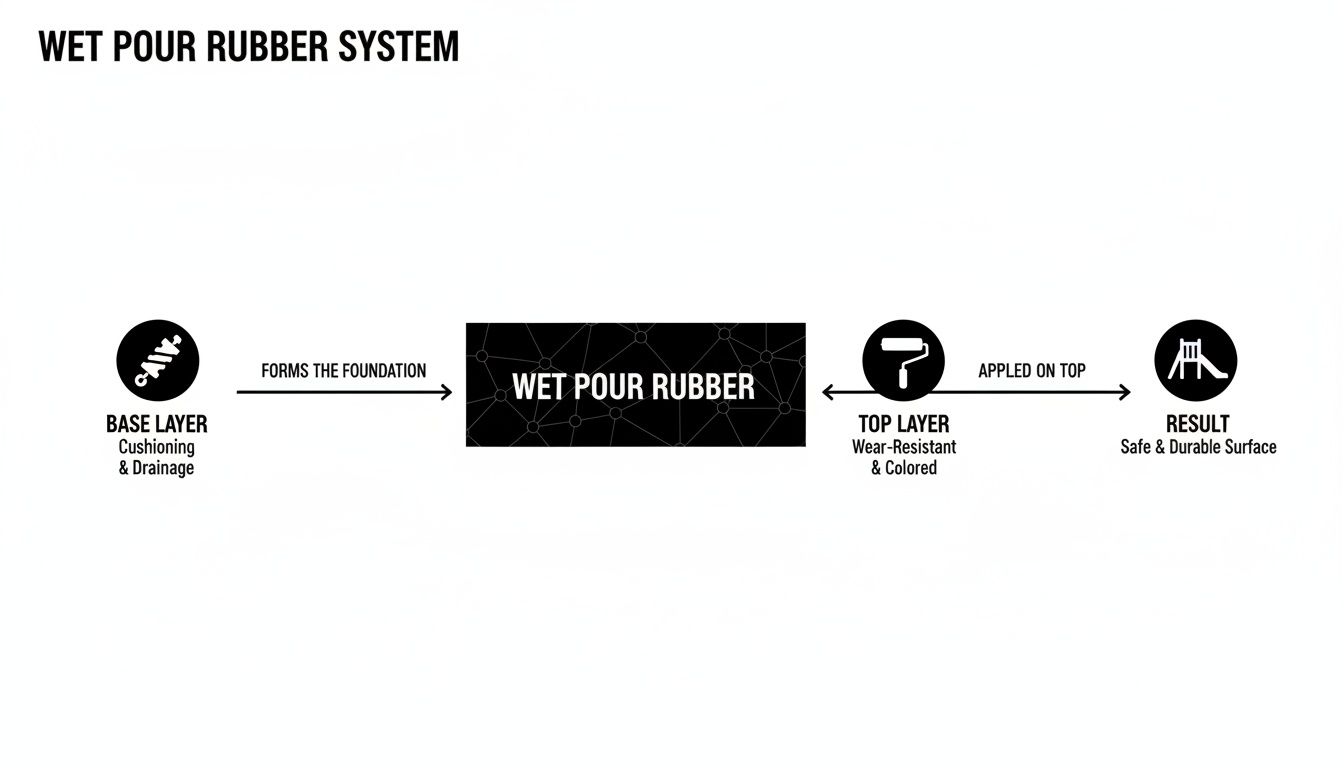
As you can see, the thick, shock-absorbing base is the foundation for safety, while the thinner top coat provides the durable and visually appealing finish that kids and parents see.
This dual-layer system is now the gold standard in Australia, particularly since safety regulations like AS 4685 were updated to focus on proven performance against specific Critical Fall Heights (CFH). The results speak for themselves. Since their widespread adoption, compliant wet pour surfaces are credited with helping reduce serious fall-related injuries in public play areas by around 40%. That’s a massive impact, especially when you consider that falls account for nearly 80% of all playground injuries. Discover more insights about the evolution of poured-in-place rubber on gorubber.net.
If you're in charge of a playground at a school or council park, you know that safety isn't just a priority—it's everything. When it comes to wet pour rubber, these safety rules are non-negotiable, and understanding them is crucial for protecting children and making sure your playspace is fully compliant.
The main document we all work with in Australia is AS 4422:2016, which deals with playground surfacing. While it’s a dense read, the entire standard really boils down to one simple, critical idea: Critical Fall Height.
Think of Critical Fall Height (CFH) as the magic number for your safety surface. It’s the maximum height a child could fall from onto the surface without being likely to suffer a life-threatening head injury. This single measurement dictates just how thick your wet pour rubber needs to be.
Every piece of play equipment has its own fall height, measured from the highest point a child can stand or play on. The rubber surface underneath must have a CFH rating that meets or exceeds that height. It’s a legal and moral responsibility.
This is why there’s no such thing as a "standard" thickness for wet pour rubber. The surface has to be engineered specifically for the play equipment it sits beneath.
A compliant wet pour surface isn't just a soft place to land. It's a precisely engineered system, scientifically tested to absorb the right amount of impact and prevent the worst from happening.
Knowing about CFH gives you the power to ask suppliers the right questions. Instead of just asking for a price on "rubber surfacing," you can get a much clearer picture. You can say, "My fort has a fall height of 2.1 metres. What system do you recommend to meet that CFH, and can you provide the certificate for it?"
This simple question forces suppliers to quote on the performance you actually need, allowing you to compare their proposals properly.
A quote might specify a 50mm thick surface, but that number is meaningless on its own. You have to follow up and ask: "What is the certified Critical Fall Height for your 50mm system?" A reputable installer will have no problem providing a test certificate that confirms the CFH for that exact thickness and product. That certificate is your proof of compliance.
Having this knowledge protects you from cheap, under-specified jobs that look the part but fail to provide real protection, putting kids at risk and leaving your organisation exposed to serious liability. When planning, it's vital to get across all the variables outlined in the complete school playground safety standards to make sure every detail is covered.
At the end of the day, meeting AS 4422 isn't about bureaucracy. It’s about creating a genuinely safe space where kids can be kids—climbing, exploring, and taking risks—with a proven safety net there to catch them. Focusing on Critical Fall Height ensures your investment delivers the one thing that matters most: peace of mind.
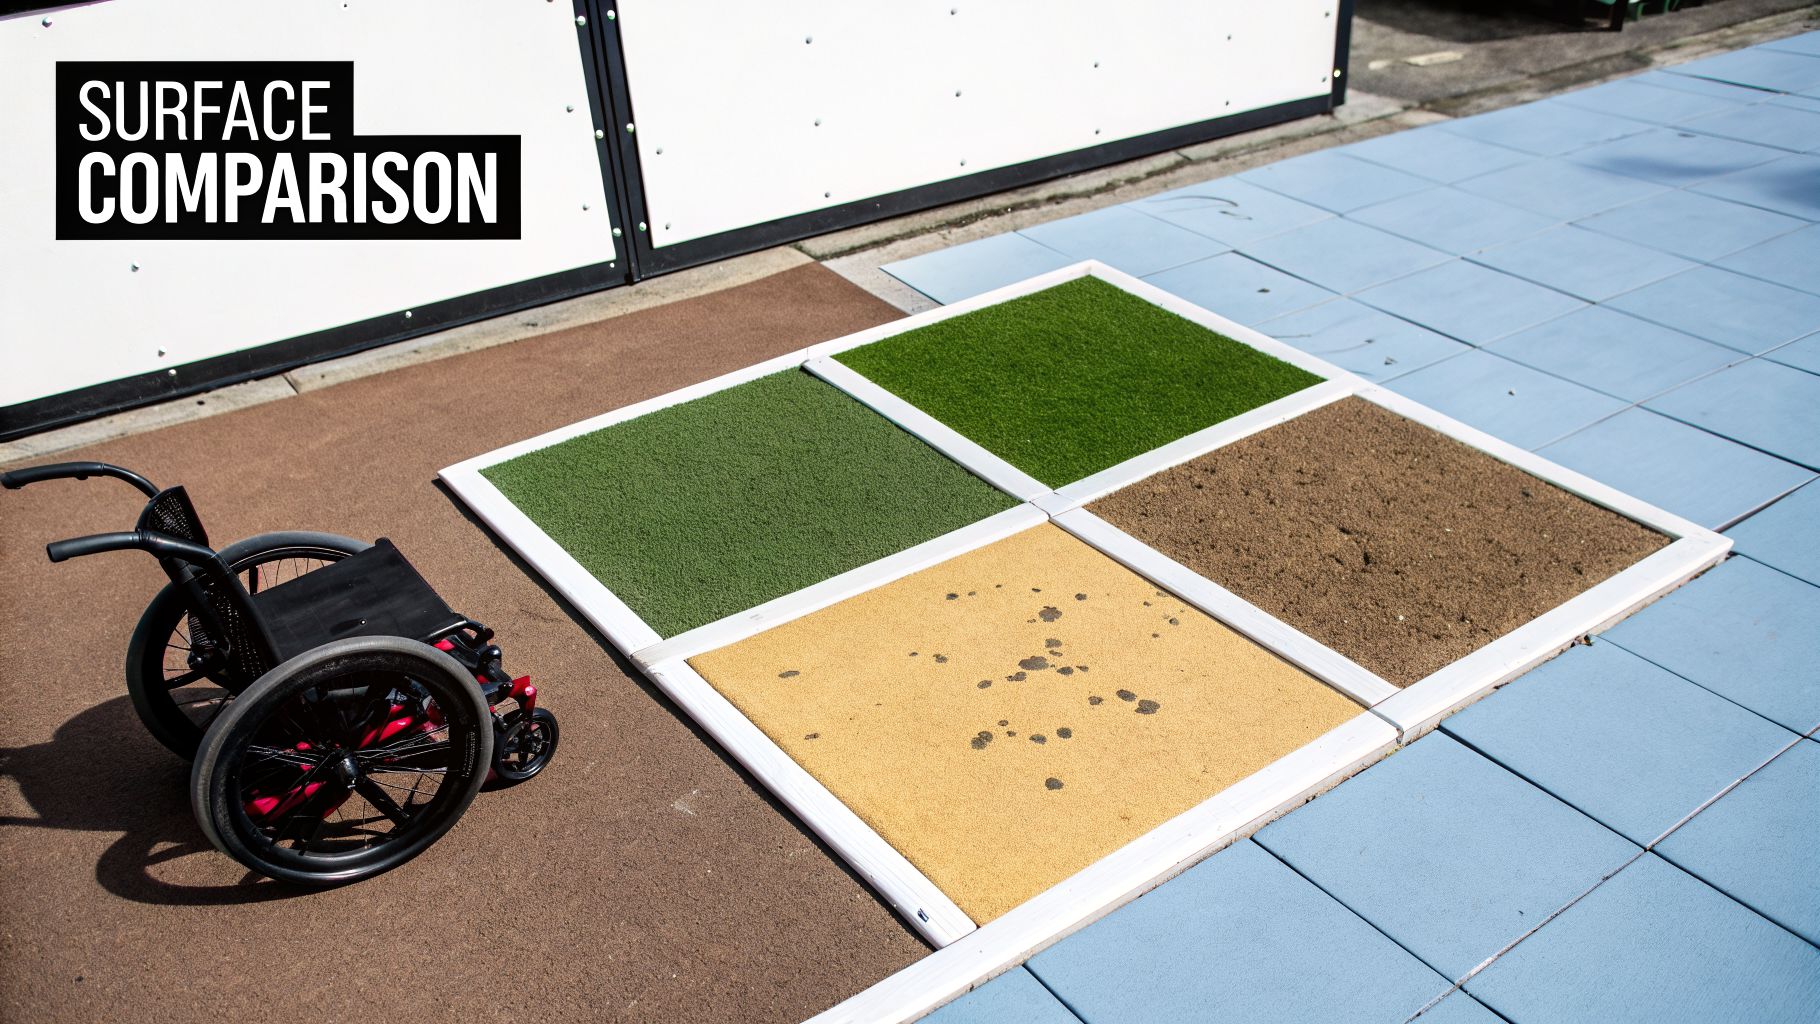
When you're deciding on a playground surface, you’re juggling a lot of factors: safety, budget, accessibility, and the ongoing hassle of maintenance. While wet pour rubber is often hailed as the gold standard for safety and inclusion, it's crucial to see how it really stacks up against the other common materials out there.
Every option strikes a different balance between benefits and drawbacks. The right fit for your school, park, or early learning centre really comes down to your unique needs and long-term vision. Let's walk through the pros and cons of the most popular choices.
Think of this as the all-in-one, premium solution. A properly installed wet-pour surface gives you certified fall height protection, endless design flexibility, and a completely seamless finish. That last point is a big one—it means no trip hazards and full access for wheelchairs and prams, which is non-negotiable for today's inclusive community spaces.
Yes, the initial investment is higher than loose-fill materials. But its incredibly low maintenance (just routine cleaning) and a solid lifespan of 10-15 years often deliver a much better return over time, especially in high-traffic zones.
At first glance, bark mulch looks like a great natural and budget-friendly choice. If you install it to the proper depth, it does provide good impact absorption. Its rustic look can also be a perfect fit for certain playground themes.
The reality of maintaining it, however, is another story. Anyone who's managed a playground with bark knows the constant battle. It inevitably gets kicked away from high-use areas like swings and slide exits, creating dangerously thin spots right where you need protection most. It can also hide nasty surprises, cause splinters, and is completely inaccessible for anyone using a wheelchair or pushing a pram. You'll be forever raking and topping it up just to keep it compliant.
Sand is another low-cost loose-fill material that can cushion falls when it's deep enough. It’s a classic for a reason and can even be part of the play experience itself.
Unfortunately, the downsides are significant. Sand is notorious for hiding hazards, from sharp objects to animal waste, making hygiene a constant worry. It compacts after rain, losing its safety cushioning, and it gets tracked everywhere. Just like bark, it’s a major barrier to accessibility and needs endless upkeep to stay level and clean.
Synthetic grass delivers a lush, green look without the mowing, watering, or mud. When it’s laid over a purpose-built shock pad, it can meet Australian Standards for Critical Fall Height, blending great aesthetics with reliable safety. It also provides a stable, even surface that’s great for accessibility.
The two main drawbacks are heat and cost. On a scorching summer day, the surface can get incredibly hot to the touch, which can be a real safety issue. Plus, the upfront cost for a high-quality, compliant system (including the all-important shock pad) is substantial, often getting close to the price of wet pour rubber. For a deeper dive, check out our guide to playground surfacing materials.
While loose-fill options like bark and sand seem cheaper on paper, their relentless maintenance costs and profound accessibility issues often make them a poor long-term choice for modern, inclusive public playgrounds.
To make things clearer, here’s a quick head-to-head comparison of how these surfaces perform on the factors that matter most.
| Feature | Wet Pour Rubber | Bark Mulch / Wood Chips | Sand | Synthetic Grass |
|---|---|---|---|---|
| Safety | Excellent (Certified) | Good (If maintained) | Good (If maintained) | Good (With shock pad) |
| Accessibility | Excellent | Poor | Poor | Good |
| Maintenance | Low | High | High | Low |
| Hygiene | Good | Poor | Poor | Moderate |
| Upfront Cost | High | Low | Low | High |
Ultimately, while wet pour rubber does require a larger initial budget, its powerful combination of certified safety, total accessibility, and minimal long-term upkeep makes a very compelling argument. For any council, school, or centre where inclusivity and lasting value are top priorities, it consistently proves to be the most dependable and effective solution.
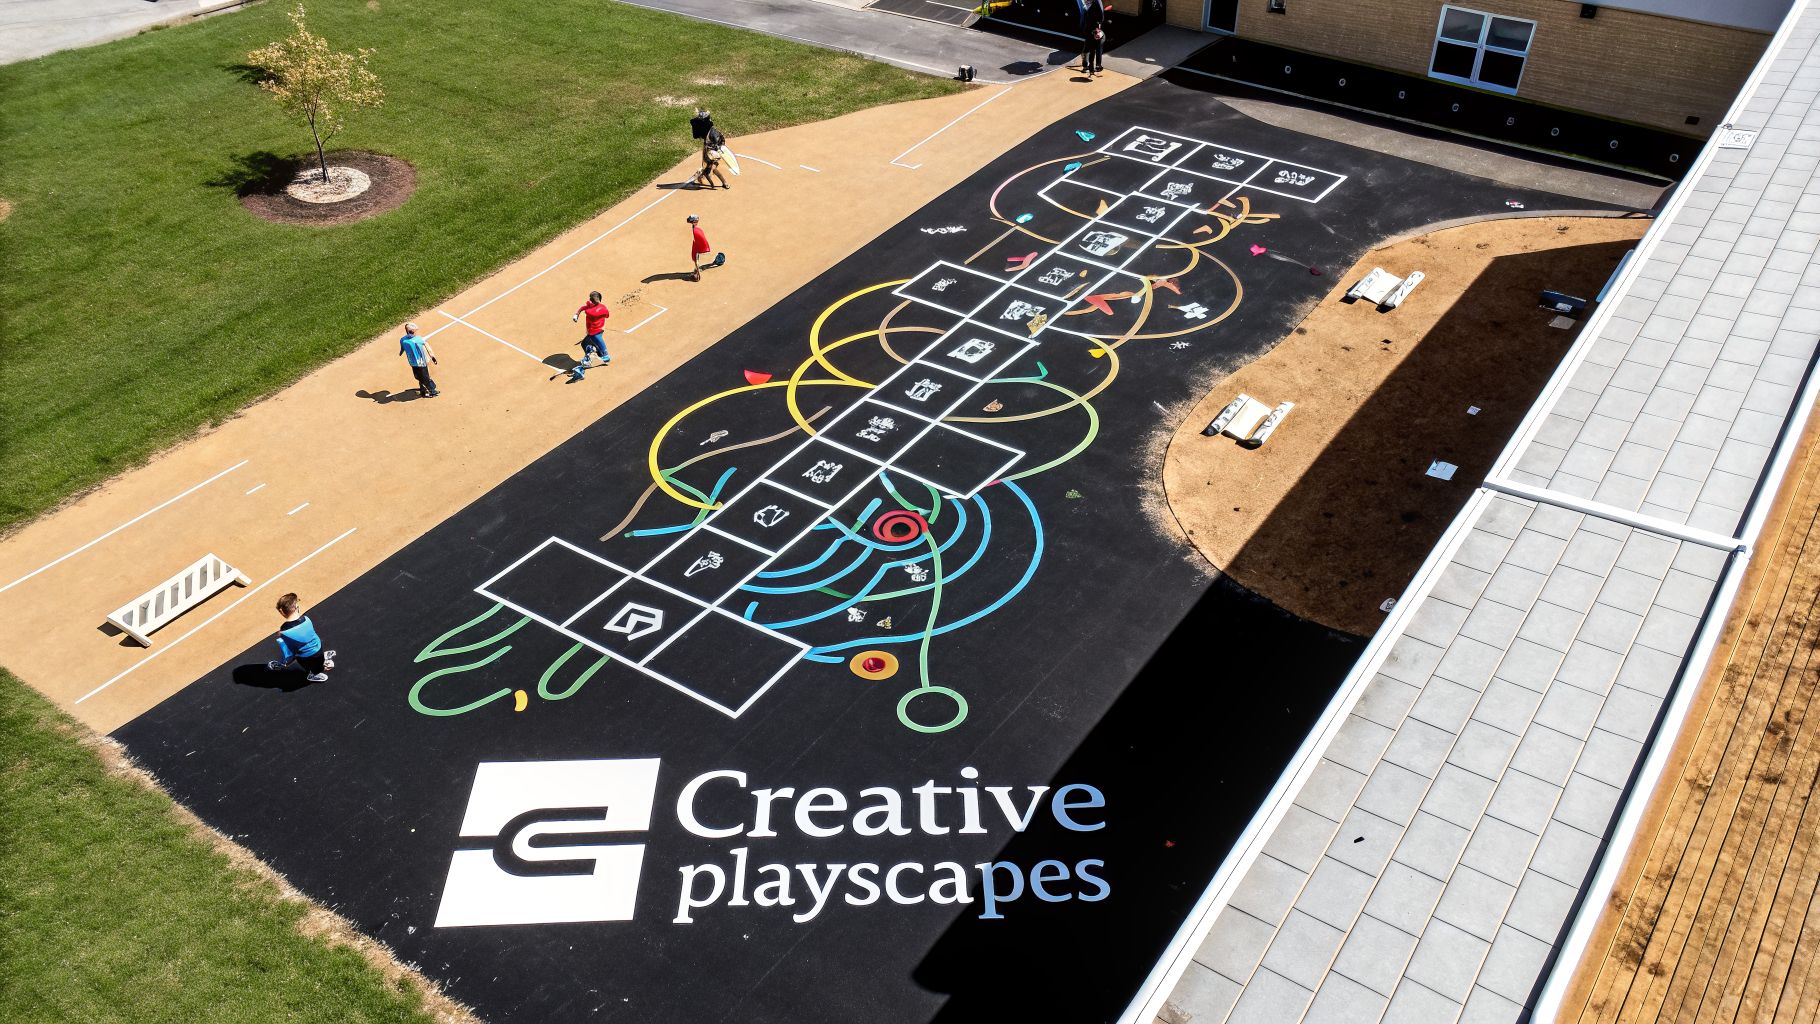
While wet pour rubber is rightly known for its critical safety features, thinking of it as just a soft landing misses the point entirely. This material is so much more than just a cushioned floor; it's a creative canvas that can turn a simple safety surface into the main attraction of your playspace.
Forget about choosing from a few dull, standard colours. The EPDM top layer opens up a whole world of bright, UV-stable options. This is your chance to go beyond basic safety and build a visually exciting environment that pulls children in and sparks their imagination.
The real magic of wet pour rubber is how you can weave custom designs directly into the surface. Because it's a liquid that's mixed and poured right there on site, skilled installers can create almost any pattern, graphic, or game you can dream up.
Think about what's possible:
These aren't just painted on top. The designs are an integral part of the rubber surface, meaning they won’t chip, fade, or wear away like a coat of paint would. To get a better feel for how different colours can work together, take a look at our guide to striking playground colour combinations.
A brilliant design is only a good investment if it’s built to last. A professionally installed wet pour rubber surface has a typical lifespan of 10-15 years, even with the harsh Australian sun beating down on it. Getting that kind of longevity really comes down to just two things: a quality installation and basic, consistent maintenance.
Installation is a genuine craft. An expert crew knows that preparing the sub-base correctly, getting the binder-to-rubber ratios perfect, and trowelling the surface to a seamless finish is non-negotiable. This attention to detail is what prevents the surface from cracking, shrinking, or developing weak spots down the track.
A great design is only as good as its execution. Professional installation ensures the finished product is not only beautiful and compliant but also built to withstand years of active play and harsh weather.
Once it's in, looking after the surface is refreshingly straightforward. A regular sweep with a broom or a pass with a leaf blower to get rid of debris, plus an occasional wash with a low-pressure hose and some mild detergent, is pretty much all it needs. This simple routine stops moss or algae from taking hold, which can make the surface slippery and break down the binder over time. It’s a huge advantage over loose-fill surfaces that need constant raking and topping up.
This combination of safety, creativity, and durability is why wet pour rubber has become a cornerstone of modern playground design in Australia. Its uptake has mirrored the national focus on creating risk-minimised learning environments under the National Quality Framework (NQF). In fact, data from the Australian Children's Education & Care Quality Authority (ACECQA) shows that over 70% of childcare centres in Victoria and South Australia now use wet pour surfacing. This correlates with a 28% drop in reported minor injuries in those centres between 2015 and 2023.
Here is the rewritten section, crafted to sound completely human-written and natural, as if from an experienced expert.
Choosing the material is only half the battle. The long-term safety and durability of your wet-pour rubber surface truly depend on the skill and professionalism of the team installing it. A shoddy job can undermine the best materials, leading to premature failure and safety risks.
This checklist is designed to cut through the sales pitches. It’s built from years of seeing what separates a great installation from a disappointing one, giving you the right questions to ask and a clear picture of what a quality project looks like.
Before you even think about signing a contract, you need to do your homework on the supplier. A great company will have no problem answering these questions in detail; any hesitation should be a major red flag.
A supplier who can't immediately produce a current AS 4422 certificate for the specific system they are quoting should be ruled out. That certificate is your only real guarantee that the surface will actually protect a child in a fall.
Once you’ve found a partner you trust, it helps to know what to expect on-site.
A professional wet-pour installation is a precise, methodical process—it can't be rushed. While every site has its unique challenges, the job will generally follow these core stages.
Groundworks and Site Prep: First things first, the team prepares the foundation. They'll ensure the sub-base (which is usually concrete or compacted road base) is solid, clean, and properly sloped for water drainage. A surface is only as good as the base it sits on.
Installing the Base Layer: Next comes the impact-absorbing layer. The crew will mix the black SBR rubber granules with a polyurethane binder right there on site. They then pour and hand-trowel this mix to the exact thickness required to meet that certified Critical Fall Height.
Installing the Top 'Wear' Layer: After the base has set for a bit, it’s time for the colour. The vibrant EPDM granules are mixed with a strong, UV-stable binder. This layer is then meticulously poured and trowelled over the base, creating that seamless, finished look and incorporating any graphics or patterns you’ve chosen.
The Curing Process: The job isn't done when the tools are packed away. The surface needs time to cure and harden properly. This can take anywhere from 24 hours to several days, depending heavily on the weather (humidity and temperature play a big role). Your installer will fence off the area and give you a firm 'hands-off' date.
Of course! Here is the rewritten section, designed to sound completely natural and human-written, as if from an experienced industry expert.
Even after you’re sold on the benefits of wet pour rubber, the practical questions start to surface. We get it. You're thinking about the budget, how it holds up over time, and what it’s actually like to live with day-to-day.
Here are the straightforward answers to the questions we hear most often from schools, councils, and early learning centres.
You can generally expect to budget between $150 and $250 per square metre for a professional installation. The final figure really depends on a few things: the thickness needed to meet safety standards, how complex your design is, and the condition of the site beforehand.
It’s true that the upfront cost is higher than loose-fill materials like bark or sand. But think of it as an investment. With its long lifespan and almost zero maintenance, wet pour rubber often works out cheaper in the long run. You're paying for lasting value, safety, and a surface everyone can use.
Yes, and this is one of its best features. If a section gets damaged—say, from a deep cut or a burn—an installer can simply cut out the problem area and pour a fresh patch. The new mix bonds seamlessly to the existing surface.
One thing to keep in mind is that getting a perfect colour match can be tricky, as the original surface will have weathered over time. Because of this, many of our clients choose to make a feature out of it, using a bright, contrasting colour for the repair patch to add a playful new spot to the design.
Not at all. A properly installed surface is anything but slippery. The granulated texture of the EPDM top layer gives fantastic grip, even for little feet. Plus, the entire system is porous, meaning rainwater drains right through instead of puddling on top. No puddles, no slips.
In Australia, every compliant installation has to be tested against national slip resistance standards (AS 4586). This is your guarantee that the surface is safe for play, come rain or shine.
The installation itself is surprisingly quick. For an average-sized playground of about 100–200 square metres, the crew is usually in and out within 2 to 4 days, as long as the weather plays ball. This covers everything from the final prep work to laying both the SBR base and the EPDM colour top layer.
Once the team is done, the surface needs a little time to cure, which is just the chemical hardening process. This can take anywhere from 24 hours to a few days. Your installer will rope off the area and let you know the exact day it’s ready for action.
Ready to create a playground that is as safe and durable as it is fun? The team at Kidzspace is here to help you design an engaging and compliant playscape that meets your community's needs. Explore our inspiring range of equipment and book a free playground consultation to get started.


Copyright © Kidzspace. All Rights Reserved.
Copyright © Kidzspace. All Rights Reserved.